Saturday, 15 December 2018

Protools 2018.8 Long Lock Time & Blog Moving to new Website

New Website

This will be the last post on this url,                    Daniel has organised a new web site for CB Electronics, modern look, and more features one of which is an integral blog that can be linked to the product pages. Here is the new url for this blog

https://www.cbelectronics.co.uk/colinbroad/

Protools  2018.8- Long Lock Time 

I received the following from a USB-422 user - Peter Persaud at Foley One, Toronto, Canada

Pro Tools sees our Soundmaster but the lock time is super long now.  Almost 3-4 seconds.  I can get it to work locally from Soundmaster instantaneously if I put the ‘Allow 9-pin Transport Commands in Local Mode’but I can’t get it to chase to the Master video player.  If I take it off and just run the Remote function the system locks but again the super long 3-4 second problem.  It seems as if the Pro Tools is ‘slewing’ and trying to catch up to speed or something.  The Soundmaster says it’s locked, the Pro Tools play bar is rolling but no sound and the Stop tally is solid in Pro Tools and the Play tally is blinking for the 3 - 4 seconds like I described  Any thoughts on how I can tighten up the lock time?

The only way that the USB-422 could cause this problems is Latency, I replied

Apart from checking that the Maclow2p3.kext is active in the Mac extensions (see how in  Mac_latency.pdf) there is not much I can suggest. Latency is critical for lock up times as high latency will cause bad positional information.

Installing on High Sierra can be tricky as Apple have added extra protection (documented in our application notes) and there are often copies of the .kext in multiple locations!

However this was not the problem, after two days Pete's replied as follows

After an afternoon with a friend name Phil Seel who is a tech at Deluxe Post Production here in Toronto he remember that he discovered this year that Avid change their Serial ‘Coding’ after Pro Tools 2018.8.  I believe that is what he called it.  We installed Pro Tools 2018.7 and everything worked super fast again.

Hopefully publishing this will help others in the future

Monday, 29 October 2018

Adding Trinnov ST-2 room equalisation to TMC-1-Penta system

I was recently asked the best way to add a Trinnov ST-2 to a TMC-1 system. The TMC-1 penta can be configured to have inserts in the output path which is ideal for  for this application.

The three main advantages of using room correction in the inserts and not after the outputs are as follows
  1. The volume control is after the room correction
  2. You can use the same room correction on multiple speaker sets by switching both outputs and profiles
  3. The TMC-1 has a insert key to enable/disable the room correction.
The ST-2 has both Analogue and AES I/O, the obvious choice in this case is to use the AES I/O.

The ST-2 GPIO option provides remote profile selection, to simplify operation we decided to to select the ST-2 profile when the speaker set is selected by the TMC-1. This was achieved by adding speaker set selection to the GP Out 1, 2 and 3 function select in TMC-1 advanced menu's 18, 19 and 20 and connecting GP outputs on the TMC-1 to GP inputs on the ST-2.

Connections between the TMC-1 and ST-2,


Note. 5v-24v external power supply (You can use a spare ST2 USB)
Power is required for the ST-2 Opto-coupled inputs, the TMC-1 outputs are open collector with a common ground.

Although the Penta is the only TMC-1 system with inserts, room equalization may be added after the outputs on the other systems and switched using the same GPIO's.

    Friday, 3 August 2018

    A-Mon Headphone Monitoring


    I received an e-mail this morning from Paula Fairfield (Sound Designer on Game of Thrones) asking about headphone monitoring on her PD-3-AMon bundle. Paula is now now working in VR and headphone monitoring a big deal!

    Paula's mail made made me think more deeply about this - with the existing software there are 2 solutions

    1) Connect the Headphones to the Mini L/S output - I have customers doing this.

    2) Use the Headphone Jack on the TMC-1 which is connected to the Headphone Cue send and "Link" the H/P Cue to the stereo down mix on the Cue Sends page

    The main advantage of option 2 is that no extra cables are required, as it uses the existing connections between the TMC-1 and A-Mon complete with a headphone socket on the TMC-1/PD-3/TMC-1-S6.

    The main problem with option 2 is that the Dim, Mute keys and Gain control do not control the Headphone Cue Output! You must use the [H/P] user key as a Mute key , and hold the [H/P]  user key depressed to adjust the H/P cue gain - not an optimal solution.

    I have now updated the TMC-1-AMon software that simplifies option 2 by automating it within a single [Phones] user key that performs the following actions

    [Phones] On

    1. Display "Phones" as the speaker set
    2. Set the Headphone Cue input to the Stereo Downmix
    3. Mute the Main, Alt and Mini Speaker sets
    4. Connect the Dim, Mute and Gain controls to the Headphone Cue Output.

    [Phones] Off or select a Speaker Set

    1. Display the current speaker set 
    2. Restore the Headphone Cue input selection and Headphone cue gain to their previous setting
    3. Enable the selected speaker set
    4. Connect the Dim, Mute and Gain controls to the selected speaker set
    This update will be available in the next release of TMC-1-AMon software, if you wish to use it before email me for a beta version of the software.

    DADman, Mom, Eucon and TMC-1-Penta


    I am often asked questions about the differences between these different controllers all of which can control the Avid MTRX, DAD AX32 or the NTP Penta. Can they can work together and what are their requirements?

    Avid MTRX, DAD AX32 or the NTP Penta

    Functionally very similar these units provide digital and analog i/o, digital patch and digital summing. In the description below I will talk about the DAD to refer to all these units. 

    DADman

    DADman is a software system for controlling signal gain, routing and summing (requires the Gain/Sum option) within the DAD. DADman requires a Windows or Mac computer to run and can be remote controlled from the Avid S6 via Eucon and/or by the MOM using a NTP protocol. The DADman software also provides metering.

    EUCON

    Software used by the S6 to control DADman, Then S6 includes a level control and talkback key. A touch screen can be used to control other functions.

    MOM

    The MOM hardware Remote is connected to the DADman software via Ethernet. The MOM has 10 user programmable switches and LED's, a single knob,  the current gain is indicated by a ring of LED's around the knob.  A Layer switch is provided to select up to 4 layers indicated by a LED.  The function the switches and knob are defined for each layer within the DADman program.

    iPad MOM App

    Available from the apple App Store the MOM app emulates the MOM and has the advantage that the switches may be labeled by the user.

    Minimum Mom-DADman system

    TMC-1-Penta

    The TMC-1-Penta connects directly to the DAD. It does not require DADman to operate however DADman may be used to route other signals within the DAD.

    The TMC-1-Penta I/O connections are defined on a windows or Mac computer using TMC1-Penta4 software and saved by the TMC-1-Penta.

    The TMC-1 has 18 switches and one knob most of which are user programmable. It has a 4.3" TFT display that is used to indicate the current signal source, level and speaker set and 8 or 12 channel metering. The display also indicates the functions of the user keys and knob..

    Minimum TMC-1-Penta System (A Mac/Win PC is required for setup only)

    TMC-1 with DADman


    Setup

    I am biased! I found the setup easier using the TMC-1-Penta software, once the inputs and outputs are defined the routing is configured by the TMC-1 software. You can define more esoteric systems using the DADman software, but as yet I have not found a user who needed more that the TMC-1-Penta can provide. 

    Thursday, 5 July 2018

    Preset or Scene - Whats in a name?

    Scene

    Whilst checking and updating the TMC-1-DMon for the latest version of the D-Mon software I found that I had labeled two user definable keys as 'Preset', Not Good!

    'Scene' seems to be used more and more  to describe setup presets, I have replaced the new TMC-1 'Preset' described in recent posts with 'Scene' and replaced the 'Preset' for the  D-Mon  with 'S.Preset'.

    TMC-1-DMon

    Whilst making the updates I added D-Mon Studio Preset to the TMC-1 Scene so that when changing the studio setup it is also possible to change the D-Mon Studio Preset. Please let me know if it is necessary to include Session snapshots? 

    Wednesday, 27 June 2018

    TMC-1 and Yamaha MMP1

    This week I have been interfacing the TMC-1 with the Yamaha MMP1. We have been waiting for a MMP1 since it was announced last year, a loan unit finally arrived last week . Before starting we had to buy a I-Pad (we are Android users and our OSC software runs on both), this arrived two days ago since then I have been writing code.

    TMC-1 Yamaha MMP1


    You can run the TMC-1 alone or with the MMP1 editor and/or remote. For testing I am running the TMC-1 with the Yamaha Editor and I-Pad App. The TMC-1 can activate all the controls on the Control View of the MMP1 remote App and some extra functions from the Editor.

    Beta test software will be available next week, the functions already included are as follows

    • 7.1 setup
    • Gain
    • Mute, Dim
    • Speaker Mute, Solo
    • Input selection and sum
    • Output selection
    • Input trim
    • Metering
    • Phones On/Off and Gain
    • Cal
    • Speaker trim
    • Talkback Enable and Gain
    • Cue Enable and Gain
    • Downmix
    Updated July 10th 2018
    I also updated the TMC-1 Meters to display a maximum of 8 or 12 channels which will be available on other versions of the TMC-1 software

    I am waiting for meter assignment data definitions from Yamaha to finalize the software

    Other News:


    The I-Mon Immersive Monitor Controller is now shipping! (Link)

    Tuesday, 19 June 2018

    New TMC-1-Penta Software for NTP/DAD and Avid MTRX

    In the previous post I explained the new Preset selection functionality on the TMC-1. I have just added an enhanced version for the TMC-1-Penta which includes the ability to  select different groups of inputs from the Input Pallet.

    The TMC-1-Penta can select between or sum up to 8 inputs which can be assigned from a pallet of 32 inputs. The new input group selection allows you to specify up to 4 groups of 8 inputs and select between them.

    Screenshot of the new Preset Page on the TMC-1-Penta configuration program
    The table on the left is used to define the presets and includes an I/P Group column. The buttons below may be used to define some standard presets.

    The table on the right is used to assign inputs from the pallet to the input groups.

    On the TMC-1 there are 6 new user keys as follows
    Pset 1, Pset 2, Pset 3 and Pset 4: Preset selection keys (The Preset name is displayed on the key)
    Preset: Increment the preset selection - the current preset is displayed at the top of the TFT Screen.
    I/P Group: Increment the Input Group - The Inputs are displayed in the TFT screen

    A beta version of this software is available on request

    Sunday, 20 May 2018

    TMC-1 and Marti Humphrey's immersive audio setup

    Daniel brought to my attention the youtube of Marti Humphrey's excellent presentation of his innovative immersive audio setup.

    https://www.youtube.com/watch?v=pDUP7EYzt8o

    Not everyone will be able to install the same number of speakers as Marti has in his studio but many may need to  monitor in different formats for example 7.1 film, 5.1 TV, Stereo TV. In this case the ability to switch simply from one format to another is very important.

    It is already possible to switch between two setups on the TMC-1 using the A/B switch but it is all to easy to forget a setting. What is required is a simple way to switch between presets that which for confidence also displays the Preset name.

    The beta-test TMC-1 software now includes four Presets, New User keys [Pset 1] -[Pset 4] are used to select the presets. On Factory Reset presets 1,2 and 3 are configured as 7.1 Film, 5.1 TV, and Stereo DownMix.

    The Presets may be configured using the TMC-1v6 Preset page as shown below. The Presets are used to set a number of variables simultaneously  as follows

    Name Displayed at the Top of the TMC-1 TFT screen with the A/B selection.
    Input Select Input or No Change
    Sur-3dB Used to select between Film  or TV Surround levels
    Bass-X Enable/Disable Bass Extension
    LFE+10 Enable 10dB extra gain on LFE channel
    Format Select Monitoring format
    Speaker Select Speaker set or no change

    The Suggested Presets may be used to select predefined presets which may then be modified as required


    TMC-1v5 Monitor Controller Software

    The [A/B] switch functionality has been modified to include the preset name and may be used to switch between presets.

    A new user key [Cal-P]  has been added to select the reference level defined by the preset.

    I have added user keys to some versions of the TMC-1 for [2.1], [LCRS], [I-Max], [DTS-X], [Auro] as well as [Atmos]. They are not yet fully implemented, I will implement them fully subject to user demand.

    Calibration: To allow for multiple formats calibration must be carried out correctly. For a multiformat system we recommend that all the speakers are initially calibrated individually to a SPL of 85dB, Then the 7.1 and 5.1 surrounds are adjusted for 85dB. This allows the Sur-3dB switch to be enabled for film7.1 or 5.1.

    To allow for future TMC1-Penta updates Auro, IMax and DTS:X formats have been included but not implemented at this time.

    Daniel is working on a number of example OSC pages to run on a IOS or Android based on Marti Humphrey's QSC controls.  Here is an example of a simple Preset page, the graphics are different but the functions are the same. You can use these as templates to create your own remote controls to the TMC-1
    TMC-1 OSC Monitor Controller


    Monday, 5 March 2018

    TMC-1 Updates

    The TMC-1 software is updated when a bug is discovered or to answer a user request, about once a year I go through the software and bring some order to the TMC-1 user interface and the new TMC-1v5-Win/Mac support program. This year I have added improvements to both.

    TMC-1 Key Assignment

    The TMC-1 is designed to work in different environments including Broadcast, Film, Music and Games. They all have different requirements, for this reason the TMC-1 keyboard is programmable. This can be daunting for the end user and I have tried to make it easier as follows:-
    • The reset options now include a simple Source Selection and Speaker set selection layout. very similar to some existing controllers. 
    The meters Page after selecting Factory I/P + O/P

    The User key layout showing the  input select and  Speaker Set selection keys


    • The new TMC-1v5-win/mac program now includes a preset page allowing up to 6 keyboard setups to be saved, updated and loaded easily.

    The Preset page allows a single click to reconfigure the TMC-1 with a saved setup and single click saving of the current TMC-1 setup.

    Calibration

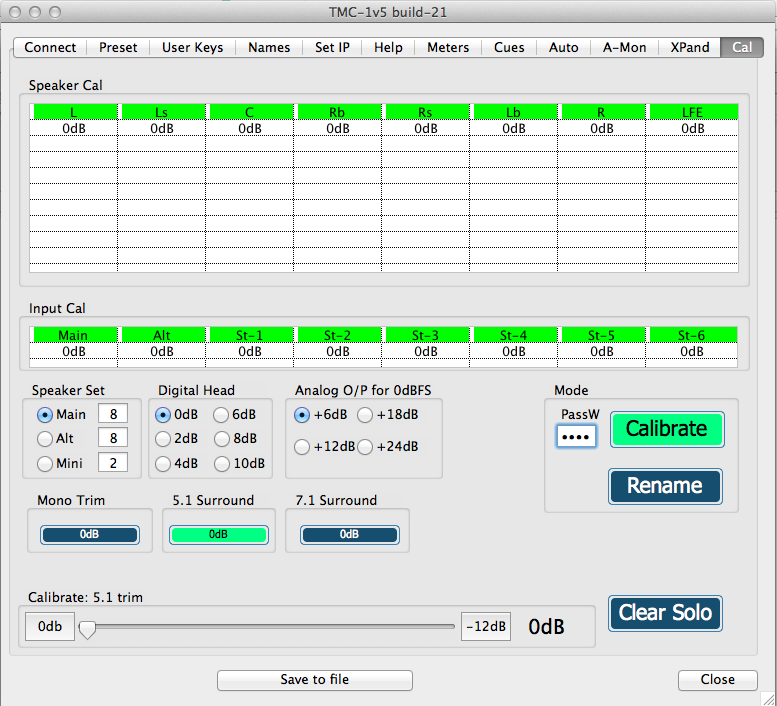
    The calibration tab makes it easier to calibrate the TMC-1 Input and output levels, the headroom and Analog level settings for the TMC-1-Penta are also included.
                                                                                                                 

    Included on the Cal page are the Mono, 5.1 surround and 7.1 surround trims (5.1 Surround tim is selected in the image). The surround trims are used when the room is setup for one format and then used to listen to a source of a different standard. For example if you calibrate a room for 7.1 and then playback in 5.1 with Ls and Rs sent to Lb and Rb you will need to attenuate the surround signals. 

    The Rename Key also allows the names to be changed from this tab. The password is required to access the gain calibration and is as normal '1984' (Big Brother is Watching).

    User Keys

    Three additions/changes to the user keys as follows
    • [A/B] user key, improved functionality now includes Input, Output, Gain and Output format a new menu allows the user to lock the A/B settings, the A/B switch will then switch between two fixed settings 
    • [T/B All(x)] user key, the TMC-1 allows you to define two separate talkback zones accessed from the [T/B1(x)] or [T/B2(x)] keys, however this requires that the zones be configured.  The [T/B All] key is simple and direct, talkback is enabled to all cue send outputs simultaneously. The (x) suffix refers to the eXternal or producers talkback enable. 
    • [DftFmt] user key has been removed and replaced by three Advanced Menu's to define the default format settings for the Main, Alt and Mini speaker sets.

    Stereo Page

    Added for the TMC-1-AMon and TMC-1-Penta, This screen displays the Left and Right channels  with the SLS and H/P cue sends. This screen is selected whenever stereo output format is selected or by the TMC-1-AMon [Meter Cues] user key.

    Menus

    To reduce the number of user setup's some have moved to the advanced setup.

    Formats

    2.1 and LCRS have been added to the format selections. The [LCRS] allows you to set a surround attenuation for mono surround. 

    Sunday, 18 February 2018

    EDL Recorder Software

    This week I rewrote the EDL Recorder software, the original software was written in Delphi some years ago, I rewrote the software in Xojo so that I can can be compile versions for for Mac or Windows and allows updates and improvements to be added in the future .

    What is an EDL Recorder

    When a live broadcast is made from multiple camera's, for example reality programs, the EDL recorder connected to the video mixer so that a EDL is generated as the mix engineer selects the live camera sources. Often highlight programs want to show what occurred before an event, the recorded EDL facilitates this.

    The EDL Recorder software is used with the P2MMC which is available with 8 or 16 inputs.

    The following improvements have been made to the EDL Recorder

    1. The EDL is generated using time of day so that it can be related to the original production.
    2. A conform key has been added allowing the Start Record time for the EDL to be set  to any value.

    More information is available on the this web page EDL Recorder 

    Thursday, 25 January 2018

    PD-3-Penta with two S3's and a MTRX Installed at Boom

    Yesterday I was at Boom Post in Soho, they purchased a PD-3-Penta for
     use with two S3's and a MTRX in a 5.1 Post room.

    PD-3 Monitor Controller/Pec-Dir

    Although we have sold PD-3's to studios in USA, this was the first to be installed in London and I was eager to see how it performed in a working Studio instead of my test bench.

    The PD-3 has two almost completely separate sections the Pec/Direct and TMC-1, each has its own processor and network connection. They share a power supply (5v or USB) and the TMC-1 Select Switch.
    PD-3 Connections

    PD-3 TMC-1

    The day before I arrived Rory configured the TMC-1 section of the PD-3, renaming the inputs and defining the user key layout he wanted. As a post studio there was no need for Talk back or Listen back (unless the studio is used with Source Connect) . They have only two speaker sets 5.1 and Stereo TV (A sound bar) I set Advanced Menu 18 to disable the Alt Speaker selection so that the [Speaker] user key would toggle between Main and Mini Speaker outputs (named 5.1 and Stereo by Rory) instead of stepping through three selections.

    New /improved User Key request

    Boom requested a single key to switch between the 5.1 and Stereo speaker sets, switching the input and the Level at the same time.  Currently the [A/B Sel] user switch only switches the inputs and not the outputs. I have now implemented this  and the [A/B Sel]  source selection,  gain, format selection (Mono/Stereo/Stereo Downmix/5.1/7.1/Atmos) and speaker selection.

    PD-3 Pec/Direct

    Connection Problems

    As Boom did not have any RS422 cables or connectors to make up the cables they could not check the Pec direct with protools. I brought with me two RJ45 to RS422 converters so that we could connect the PD-2 using Cat5 or Cat6 cables and a tie line between the studio and machine room.  In the Future we will include these with the PD-3 and PD-1-Net!

    We connected up....... nothing, none of the  LED's on the USB-422 were flashing. I downloaded the USB test program and checked each Cat 5 cable - the first was broken or it could have been a crossover cable, often required in the days before auto switching. The second time we connected ,,,, still nothing. The Protools remote input was checked and correct. However we had disconnected and reconnected the USB-422, we reverted to the normal solution...

    Restart Protools

     ... Hey Presto it worked! Both the Rx and Tx LED's on the A port of the USB were flashing merrily. 

    Stem configuration using PD-Stem

    As the track names on the Protools session were not correct for the PD-3 auto-stem routines we decided to use the new PD-Stem software to configure the Stems on the PD-3. Boom individual tracks for multiple channels so that we defined each stem as Mono so that there was only one track. We defined 8 Stems two of which were set to Print Master and Solo Safe. (The PD-3 uses Mutes for soloing the stems, this allows the Stems to be solo safe within Protools and be soloed by the PD-3). Once we downloaded the Stem Configuration to the PD-3 we found that the Tallies were working but not the commands - on Protools we had forgotten to Enable Record in Local mode! 

    Record Control

    In the USA PD-1 users are used to using the paddles to record directly, especially useful when there is more than one operator. Boom arm with the paddles and using a master record command to drop in and out of record, we set menu "Unit-3 Record Paddles" to "4=MastRec" this allows paddles 1-8 to Arm the tracks and the Master Paddle to be used for record on/off. To use an external record on/off key and keep the function of the Master Record Paddle set this menu to "3=Arm & Stay".

    Once Boom have used the PD-3 for a few weeks Daniel and I will visit the studio again and find out how it performed in a studio environment instead of my test bench!


    Monday, 30 October 2017

    TMC-1 OSC Talent Remote and Cueing

    Last week I was in LA, on Friday I met with Joe Gorfinkle, he and Wes Dooley took me to LAX, on the way we brainstormed on uses for multiple OSC Remotes, on my return I generated a talent Headphone cue screen.

    The TMC-1 implementation of OSC allows for multiple controllers to be used simultaneously. You can use the sample OSC pages that I designed or design your own talent controls. The talent can then control his own monitors using a tablet or mobile phone app. 

    TMC-1 OSC

    The four selection keys(Link, Cue 1, Cue 2 and Cue3) allow the talent to select the sources, there is a fader for the level and a Talk key to activate the Listen Back input.

    The 3, 2, 1, Go LED's are activated by Midi Note On messages from the DAW and can be used to cue the talent.

    I will add talent screens for each of the Cue sends to the OSC file available from the TMC-1 page.

    New User Keys - Talkback to All

    Whilst in LA I added a [T/B All] and [T/B Alx] user keys, as the name suggests these keys talk to all cue outputs and do not require any setup. By positioning them in logical order with the talkback keys  the numbers of subsequent user keys have changed. This changes the user key numbers for OSC. To simplify OSC implementation The TMC-1 now displays both the Number and Name of the last user key depressed in the top line of the TFT Display. 

    I-Mon AES Revisions

    My plans for the I-Mon changed on the first day of the AES in New York, where I was informed that Netflix and possibly Amazon had decided on 9.1.6 as there home cinema format! I decided to include this format in the new I-Mon design. Unfortunately this will put back the release of the I-Mon Analogue immersive Monitoring system to January 2018.

    Dolby also informed me that in most installations the Surround bass extension speakers are placed next to the LFE speaker. To simplify installation I decided to provide Surround bass extension via the main LFE output.

    What does this imply for the I-Mon design?
    The A-Mon frame has 32 inputs and 24 outputs with an extra 8 outputs if External Metering available as an option.

    To optimise the use of inputs and outputs I decided to add the extra 4 inputs and outputs required by 9.1.6 to the 7.1.4 design using links on the board and software settings. This allowed the I-Mon to be configured for 9.1.6, 7.1.4 or 7.1.6 using links to assign inputs and outputs.

    The metering switching also needs to be enhanced to allow all 16 outputs to be monitored in two banks of 8.

    I-Mon Revised specifications for 7.1.4, 9.1.4 and 9.1.6

    I-Mon Immersive Monitor Controller

    Note. Links are used to switch between Cue Input 3 or T/B input 2 and L/B Mic input 2

    Friday, 13 October 2017

    Connecting OSC to the TMC-1

    OSC in now available on all versions of the TMC-1 software. Several people have asked how to connect OSC to the TMC-1, below is the diagram from TMC-1 Reference showing how to make the connections.  The only requirement is a Ethernet Server - WiFi or Wired depending on your connection to the tablet.

    OSC Wifi Connections

    TMC-1 OSC Monitor Controller Connections
    The Computer connection is only required if you wish to control your DAW (Protools, Logic, Nuendo...) from the same OSC App on the Tablet. The TMC-1 will forward any commands that it does not recognize to the Computer, TouchOSC Keyboard and Midi commands will be routed directly to TouchOSCBridge on the Computer. If further routing is required you can install Osculator on the computer.

    Please check the web first when you need information, I try to keep the web copy of TMC-1 Reference.pdf up to date and add extra information regularly.

    Links


    • TouchOSC for you phone or tablet is available from the Apple App Store  for IOS or  Google Play Store for Android.
    • TouchOSC-Editor to design your personal screens  and TouchOSCBridge to control your DAW are available at hexler.net
    • Osculator OSC routing software is available at https://osculator.net/

    AES NY 2017 STAND 214

    Thursday, 5 October 2017

    Design Considerations for the I-Mon Immersive Audio Monitoring system

    The I-Mon is our new 7.1.4 Immersive Audio Monitoring system, based on our existing A-Mon Monitoring system with a number inputs and outputs reassigned. The combination of the I-Mon and TMC-1 is a stand alone Atmos capable system for the smaller studio.

    The problem with analogue circuitry is that unlike digital systems the routing is defined by the hardware. The modular design of the A-Mon enabled the I-Mon to be made by redesigning a single board.
    I-Mon Specification
    Inputs :: Outputs
    Main Input : 7.1.4
    Alt Input: 7.1
    2 dedicated Stereo inputs
    2 or 3 Stereo and/or cue inputs
    Stereo AFL input
    1 or 2 Talk back inputs
    1 or 2 Listen back inputs
    Main Output: 7.1.4
    Alt Output or Rear Bass Extension: Stereo
    Mini Output: Stereo
    4 Cue Send Outputs
    Stereo Downmix Output
    Optional External Meter O/P
    Slate Out

    You can download a I-Mon/A-Mon/XMon comparison chart  comparison.pdf


    The I-Mon uses the same chassis as the A-Mon and has the same number of inputs, outputs and internal switches, the design of the I-Mon involved some compromises and rethinking,

    1) Remove some A-Mon features for listening to 5.1 and 7.1 on Stereo speaker or 7.1 on  5.1 speaker layouts - No Centre speaker, No Rear speakers, No LFE Speaker.
    2) Reassign  2 Stereo inputs  as 4 Overhead inputs
    3) Reassign 4 of the Alt outputs as 4 Overhead outputs
    4) reassign 2 of the Alt outputs as Left and right Surround Bass Extension or Stereo Alt Output.
    5) Cue input 1 can reconfigured as 2nd Talkback and 2nd Listen Back inputs.
    6) Reassign SLS and H/P metering as Overhead input metering
    7) Move Left and Right Metering to after Left and Right Source selection to allow SLS and H/P metering when PFL active
    8) Add switching enabling the Cue Inputs be used as stereo inputs
    9) Add an External metering output.
    10) Add an Ethernet remote control connection

    The PCB layout for the new card is now complete, we are now consulting with users before ordering and making the PCB's and metalwork. We welcome your input, especially before we commit the design to hardware!

    Delivery for the I-Mon is currently about 6 weeks.


    Wednesday, 20 September 2017

    A-Mon External Metering

    Currently there are 2 methods with the option for a third if requested

    • Using the 5.1 Output for Metering

    Advanced menu 19 is used to select the Alt-Output function, select '5.1 Meters' to use this output for metering.

    • Connect a unused Cue output to Stereo meters  
    There are 4 cue outputs on the A-Mon, if you have an unused output it can be used to meter the Left and Right down mix by enabling 'Link' in the cue sends page. If you also enable the talk back to the cue output you can check that the talk back level is correct (thanks to Owen Curtin for this suggestion).
    • Modify the 7.1 rear outputs to feed Stereo meters
    If your speaker setup is Stereo or 5.1 we can supply a plug in modification kit to route the Left and Right signals to the Rear Outputs. This will require a software switch added to the A-Mon which I am happy to add if/when a customer asks.

    Wednesday, 16 August 2017

    OSC compatible Firmware released for TMC-1-AMon. TMC-1-XMon and TMC-1-Penta

    Released today the software includes a OSC Slave output allowing the TMC to pass through un-recognised OSC commands to other device. You can now control the DAW using Midi/Hui/Keyboard commands from the same screen as the TMC-1.


    Friday, 28 July 2017

    Open Sound Control for the TMC-1

    After publishing my initial idea's for a tablet interface to the TMC-1 using HTML, one of our users (James Chappell) suggested that I look at TouchOSC. After investigating OSC I have shelved the HTML interface and spent the past week developing an OSC interface.

    The main advantage of using OSC is that users can design their own interfaces incorporating only the functions that they need, simplifying the user interface. Multiple pages allow for different applications. OSC applications are available for IOS and Android I have not found any for OSx or Windows.

    You can see the two test interfaces I designed below The first includes input selection (user keys), metering, output level control and Level indication. It has been designed fot the TMC-1-Penta which can select between 8 inputs. I was impressed with the meter performance using an old Android tablet.  A nice touch is the battery status indicator


    The second screen below is a cue source selection page complete with level controls and enable keys, This design may be used as a template and unused input and output controls deleted.


    I have now finished two more test pages and I will be releasing this software for the TMC-1-Penta, -XMon and -AMon later this week - I also found how to label the tabs!


    For the TMC-1-Penta only - Note :the latest Penta software has 32 Palette entries instead of 16.


    The images above were taken from the design s/w, the Tablet and my phone look the same or better.


    TMC-1 with tablet in my workshop - designs for the 3d printed cradle are also available.

    Initially I intended  to use OSC-Midi commands but then decided to use direct OSC commands to control the TMC-1, if the controls are named correctly they will connect directly with the TMC-1. The user can define the label names but it is recommended that the TMC-1 updates User Key labels as they can be dependent on the interface (Penta, XMon, A-Mon) and can change when the s/w is updated. All controls are updated when the page is changed, the interface is bidirectional and updated in real time. The meter block uses a multi-fader graphic.

    I am currently controlling the TMC-1 from a tablet and phone simultaneously.  The first command on either will update the display tothe current TMC-1 status. The [TMC-1] key is used to re-sync the display without change. To reduce Ethernet traffic I meters are only activated after an initial touch, as not all designs will include meters. Ping should be enabled with a 10 second delay to keep the meters running.

    Push keys are made from three elements, the key, the label and the LED for status indication.
    The cue routing keys are Toggle buttons that include on/off indication. The meters are made using a multi-fader. SPL indication is simply a Label. TouchOSC is available to download for $5, the design software is free and available for both Mac and PC.

    I envisage other stand alone applications the firmware outside of the TMC-1, for example controlling Mic Amp's, GPIO, or Older Midi instruments from tablets or even mobile phones. Next week I will be releasing OSC enabled versions of the TMC-1-Penta/XMon/A-Mon as well as at least two templates.

    For those who may wish to check out the beta test software a design package which includes firmware for the TMC-1, 3d designs for a tablet cradle and templates is available here-
    TMC1_OSC.zip

    Thursday, 13 July 2017

    TMC-1 web app for Computer,Tablet or Phone (Windows, Mac, Android or iOS)

    I have spent the last week developing a web app for the TMC-1, I started because Toshiro Kobayashi from Tac Systems requested that we increase the Pallet size on the TMC-1-Penta, one of his customers needed to select from more that 16 inputs!   In the next software update I have doubled the size of the Pallet allowing a maximum of 34 inputs- Main, Alt and 32 inputs in the Pallet.

    I saw a problem for users selecting the inputs from the pallet. Initially I thought to make a computer app as an alternative selection tool but on discussion with Daniel who works with me we decided that a web based app would be more useful. Daniel had mentioned if it was possible to add a tablet interface to the TMC-1 previously some months ago.

    To implement the app the TMC-1 becomes a server, allowing one device to be connected. The web page is dynamic and both control the TMC-1 and display the current status. There main problems to implement this on the TMC-1, Memory size and Status indication.

    Memory size:
    A small DAW has 4 GBytes of memory, the TMC-1 has less than 1 MByte. To send a web page you must first know its length, as page is dynamic the software must first write the page in memory to calculate its length - the memory size determines how much can be displayed.

    Status:
    The best way to display the status is to use a web socket, however this requires a encrypted handshake and json on the server in this case the TMC-1. I decided that this was too much for the first implementation and to use polling, A new menu allows selection of 8, 4 and 1 second polling  as well as manual update. To reduce the overhead the TMC-1 will reply with no-change message unless a key is depressed.

    Here is a screen capture of the output from a TMC-1-Penta

    I may change the L/S keys for the TMC-1 User and Function keys, this will allow the user to select their function.

    The next Blog entry will detail the Beta test version of the software


    Friday, 26 May 2017

    TMC-1 Ashly ne8800 DSP Monitor Controller Interface

    In response to customer requests we have now interfaced the TMC-1 to the Ashley ne8800 DSP processors.

    Ashley ne8800

    The Ashly ne8800 is an interesting unit, limited by having only 8 inputs and 8 outputs with summing, but unlike the NTP digital router it has DSP on both inputs and outputs - Summing, Equalization, Delay, Crossover and Dynamics. Supplied with Analog in/out as standard  AES/EBU and Dante are available as an option.

    The Summing allows  the TMC-1 to implement down mixing, I have included the standard TMC-1 set of formats:

    • Mono Sum
    • Stereo only
    • Stereo Down Mix
    • 5.1 Down Mix from 7.1    
    • 5.1 with side surround routed to both side and rear
    • 7.1 
    • Atmos (7.1.4 on this implementation).  

    The first unit shipped with Ashly software is a PD-3 which combines a PD-1 with a TMC-1. The PD-1 is improved by adding a OLed display, ethernet port and the new PD-2 software.

    PD-3 Film Monitor Remote

    The limited number of inputs and outputs made designing systems with the ne8800 a challenge, however the TMC-1 is able to talk to multiple ne8800's increasing the possibilities.

    The initial request was for a 7.1.4 film post production room which used two ne8800's. one for the 7.1 inputs and outputs, the other for the 4 overhead speakers, There were 4 unused inputs and outputs on the second ne8800, by routing the Left and Right outputs from the first ne8800 through the second ne8800 we were able to add a stereo input and a mini stereo output.


    The initial design has a fixed configuration but if there are a requests for further systems I will write a system configuration program similar to the TMC-1-Penta2 program that will enable users to define inputs and outputs by their unit and channel number.

    Using the AES/EBU and Dante inputs or adding a further ne8800 it is possible to select more inputs. To add Cue Inputs, Cue sends, AFL, talk back and listen back would require a third ne8800. It is possible to make a large ATMOS system from multiple ne8800's all controlled from a single TMC-1.